Thursday, March 22, 2012

Good news for the blogger now you can write new post to your blog or update your blog even when you don't have PC or laptop along with you or when you are on the go now keep your readers updated with new posts.
The first Question in your mind if not using PC or laptop then how can we write blog? But it is possible you just need to have an android phone and a blog and it is possible. Here i an using my galaxy y to write this post on this blog now what will you have to do to write blog from your android phone it is very easy to write blog first of all you should have a topic which is the most important part of blog. Now open android market from your which is recently changed to Google Play(Play Shop) and click on search image on the upper right corner now you will see search bar type "blogger" in it and OK now you will see list of apps select the app which is named as Blogger. It is free app now download and install it now you are ready for blogging on the go.
Features:
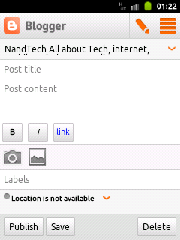
This is official version of bloggers app.
you can directly include picture in your post from your phone camera or already picture store in your phone.
you can add links to your post.
you can add label to your post.
you can add location information.
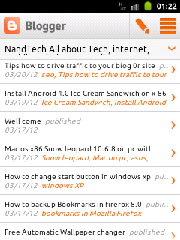
you can see the list of all your previous post.
If you have more then one blog no problem you can easily switch between them. You can also add multiple account and switch between them.

Screen shot


Enjoy blogging on the go.
Read More

Tuesday, March 20, 2012

Today here i am going to share my own experience with you on how to drive traffic to your blog and i hope you will find it helpful. Here i am just going to share only the things that i did and now my blog is getting good traffic around 3500-4500 page view per day not bad for my new blog "androidonkey.tk" which is only 4 to 5 months old. As now a days creating a blog is very easy and free but now the question is if you have blog with lots of useful information but it does not have visitors then all your hard work goes to vain. Here are the few main reason why a blog may not get traffic if your page is not appearing on the first page of search engine because search engine is the best way to drive lot of meaningful traffic to your blog next reason is that your previous visitor may not remember your blog address so how to over come this and get traffic to your blog.
Steps to increase traffic:
write meaningful, long and original post in your blog the post should contain few keywords this help you to get listed on first page of search engine(seo).
Do not try to copy contain from other site.
Try to promote your blog on social networking site like face-book, twitter, ibibo,etc. help you to drive few extra traffic.
Don't try to re-edit your post this may lead to lose your search engine rank to that particular post.
Try to submit article to article directories with your blog address included in your article
Your blog must contain subscribe by mail, subscribe by rss, bookmark button etc. which make easy for your readers to remember your address and they get updated when ever your blog have a new post in this way you can retain your readers.
Always try to update your blog with new post at regular interval of time so that your readers get new information.
Don't try to keep pop up ads or something similar to it that may disturb your readers.
Try to write your blog which is simple and easy to understand never try to use short form or complicated words (bombastic words).
Try to exchange links with other blog or site this will help you to get few more traffic and good page rank
Try to comment on blogs that allow do follow links.(your comment should include your blog link )
Try to use simple and nice template, widgets should be placed in correct manner, your blog should be easy to navigate, the font color and body color must be selected in such a way that it is easy for your readers to read your post.
Don't try to place flash and too many graphics because this will increase page load time.
Try to place link to related post (example: if you are a new blogger and want to get free domain click here) Now most important thing place link in such a way that it opens in new tab other wise your reader navigate away from your page this leads to increase bounce rate of your blog.
Try to answer question of your readers with helpful answer.
There should be an option for guest posting in your blog or try to invite blogger who can write post for your blog as a guest author (if you want to write for us then click here an fill the form)
Try to use picture or videos that best explain your post some times picture or videos can provide more details then words.
Always try to write blog on topics in which you have experience.
Last thing that i will like to say submit your blog to search engine. This are the few points that i have experienced and now sharing with you to get traffics to blog if you have any more suggestion then please feel free to leave comment below.
Read More

Monday, March 19, 2012

Install Android 4.0 Ice Cream Sandwich on x-86 based pc or laptop
As we have already posted our blog before on how to make boot-able usb of Android x-86 and install Android on x-86 based Pc or laptops But if you are new here then you can visit our previous blog where we have already posted tutorial on how to make bootable usb of Android 2.2 x-86 iso and install it on pc or laptop as the procedure will be same.

Introduction:
So as all of as knows that recently Google's new mobile operating system Android 4.0 Ice Cream Sandwich has been lunched so now we can test this flavour on our x-86 based pc or laptop .What is new in latest android Ice Cream Sandwich It’s fast. Even better, the latest version of Android-x86 comes with access to the Android Market, which means you can try out thousand of Android apps from Android Market which is now known as Google Play.
Important tutorial link:

How to make boot-able usb of Android x-86 iso Click here
How to install Android on X-86 based pc or laptop Click here

Installation:
First of all let me tell you that there are few different version of Ics Android-x86-4.0-RC1 available Here for download now you will have to Grab the version that best fits your pc or laptop if you are not sure which version to download just google to find out which version fits on your pc or laptop
Different versions of android X-86 ics 4.0-RC1 With platform support are:
Android-x86 4.0-RC1 live and installation iso for AMD Brazos platform
Android-x86 4.0-RC1 live and installation iso for ASUS Laptops/Tablets.
Android-x86 4.0-RC1 live and installation iso for ASUS Eee PC family
Android-x86 4.0-RC1 live and installation iso for Lenovo s103t tablet
Android-x86 4.0-RC1 live and installation iso for Tegav2 (Atom N455 tablet)

Now if you have selected the best os version that fits your platform or model number of pc or laptop Download it from this link here it will be .iso file type.
Now lets move to the next step boot-able CD or USB:
As now you have downloaded the appropriate iso for your pc or laptop now you can either burn bootable CD or make a bootable usb. I hope all of as know how to burn bootable image to CD or DVD.
So next is how to make your usb bootable. For tutorial click here
Now lets move to the next step Installation:
As i have already provide you the link above in this post on the tutorial how to install android on x-86 based pc or laptop if escaped click here
ScreenShot:


Conclusion:

Enjoy android.. and don't forget to leave your comments and suggestion
Read More

Wednesday, March 14, 2012

Tutorial how to map Dot TK Domain in blogger.As we have already introduced to you about Dot TK in our blog few months ago but if you have missed it then just check out here. If you are a new blogger and want to register free Domain name for your blog then it is possible with dot tk.With dot tk you can either do URL Forwarding, your own name servers or Dot TK DNS Service to point your domain to the right content example of our blog click here . So to day we will just tell you how to map Dot TK Domain in blogger for free But don't map a domain if you are not ready to promote your website. Otherwise, you have to make sure that you have at least 25 site visits within 90 days or Dot TK will delete your domain. Paid Dot TK domains are free from an obligation. If you want to get paid domain from dot tk for free it is possible which we will cover in our coming post but now lets us come to our main topic that is how to map Dot TK Domain in blogger.
So here are the steps that you have to follow:
First of all you will have to go to dot tk click on image below to go to dot tk or click here


Now select Register Domain tab and enter a desired domain name that you want to register and click on GO as shown on picture below.


Now you are proceeded to next page select the radio button saying Use DNS in Use your new domain category and select the tab Dot TK DNS Service in both the host name fill the value IP 216.239.32.21 actually there are four different ip but at present only this one is only working. Then enter the time period min 1 month max. 12 months, Type the verification Code and click on sign up.As shown in picture below


Now sign in using your existing account from Google, face book, etc. or use your mail address to sign-up.


As now you are registered just click on log in on the upper rhs of the page and select Domain panel


Now click on your domain name here www.jobigov.tk click on yours a pop up windows appear now select type to CNAME Record from drop down menu and Add host name with "WWW" example www.jobigov.tk and in IP add "ghs.google.com" and click on save changes.As shown in picture below:


Now as we have registered our free domain and activated it so now lets go to our blog.
Blogger Configurations
Log-in to your Blogger account.
Go to Settings >> Publishing >> Custom Domain

Now click on Already own a domain? Switch to advanced settings. Now fill up the form Make sure you entered properly your Dot TK domain on the domain box. fill up the verification code and Click Save and you are done for Blogger.see the picture below:


Now our blog www.jobigov.tk is on top level Domain congratulation.Changes don't take effect immediately. It might take an hour or two. Just keep checking your Dot TK domain.
Need any assistant leave comment.........
Read More

Thursday, March 8, 2012

Download chainfire 3d for samsung galaxy y an android phone.


Description:
    Chainfire3D - Take control of your phone GPU (OpenGL) Chainfire3D is an intermediary OpenGL driver. What does that mean? It means that Chainfire3D sits between your apps and the graphics drivers, and can intercept and/or change commands between the two.
Download:
                    ChainFire 3D  APK
OR
                    Google Play Link chainfire 3d

It has some built-in functions, and can be further extended with plugins to provide extra functionality.Download link plugins
Read More

Wednesday, March 7, 2012

Tutorial how to use an android phone samsung galaxy y as a webcam using Usb cable.

Use your an android phone as a webcam for video call like on MSN or Skype, Google+ hangout or for video chatting. Why to spend money to buy Webcam if you can easily use your samsung galaxy y an android phone as a webcam. So now i am going to write this tutorial it is simple and easy just follow the steps correctly. So lets configure our android phone as a webcam via USB cable.


First of all lets configure our computer runing windows 7:
As android devices can communicate with PC using USB cable only in debugging mode using ADB. So first of all we will have to install and configure ADB (Android Debug Bridge). Download android sdk from here android-sdk_r16-windows.zip
Now extract it to root directory of computer say "C:\android-sdk-windows" and run SDK Manager.exe and then install Android SDK Tools and Android SDK Platform-tools.
Now ADB installed we shall add their paths to the PATH environment variable to do this in Windows 7, right-click the ‘Computer’ icon and click ‘Properties’. Now click ‘Advanced System Settings’ from the options in the left pane to bring up the ‘System Properties’ window. Then click the ‘Environment Variables’ button on the ‘Advanced’ tab and find ‘Path’ in the ‘System variables’ section and click on edit (Note: Do not Delete any thing) and add as the line below at the end of the line with semi-colones and click ok.

;c:\android-sdk-windows\tools;c:\android-sdk-windows\platform-tools

Install usb driver if not installed . Now download and install client application on your computer from here Dev47Apps.
Now lets configure our android phone and install the required application:
First of all we will have to set our phone to debugging mode to do this Menu > Settings > Applications > Development > USB debugging). 
Download Droid-cam from Android Market it is free install it and run it. It will display "Starting server..." message 

Screen Shot:

        Server on phone

         client on pc

Now Start the Droid-cam client on your pc and select "connect to phone (USB)" option then click on connect. 
That is it enjoy Chatting.
Read More

Monday, March 5, 2012

Quickly "reboot" your android phone to free up memory. This is one of the best application to free up yours Android phone memory. It will make your phone run faster and the life of your battery will be increased.

Description:
     With Fast Reboot you can Quickly reboot your android phone and free up memory. Simulates a reboot by closing/restarting all core and user processes and thus frees up memory. Your phone should be much snappier after using Fast Reboot. Does not actually reboot your phone, only the apps & processes the free version lack some functionality like automatic reboot and manually exclude apps from being killed.  Download Link
Read More
Walkman Player with Rainbow theme for samsung galaxy y an android phone.
This is a Walkman series music player for those who are running android phones and wanted to have Walkman music player on their phone.With this player you can listen local music that you have stored on your phone memory or you can listen online.
Screen shots:


Enjoy your music  Download Link
Read More

Sunday, March 4, 2012

How to Share or connect internet from Galaxy y an android phone to Mac os x using usb cable.
As we have already written a post before where we have shown you how to share or connect internet from samsung galaxy y to windows based pc or laptop using usb cable so today we are going to write a tutorial on how to share or connect internet from Galaxy y to Apple Mac os x is very easy below are the steps how to use your phone internet on mac os x using usb cable.
Steps to connect internet on Mac using SGY S5360 an android phone :
First of all you will have to download pdaNet from here
Now install it on your mac and restart.
Now from dock click on system preferences and select network a new windows appear where you will see etherneten2 on left hand side if not click on + sign and add Ethernet adapter en2 from interface drop down menu.
Now from phone menu go to Settings > Applications > Development > and check the box saying USB debugging.
Now connect your mac and SGY using USB cable.
Now from the dock click on application and select pdaNet now you will see small icon on your task bar click on it and select install pdanet to phone from drop down menu .
As now pdaNet is installed to your phone run it and select " Enable USB Tether"
Now on mac click on pdanet icon on the task bar and select connect from drop down menu now the icon will begin to blink blue. net is connected.
Read More
Related Posts Plugin for WordPress, Blogger...
Google Google+